Short answer
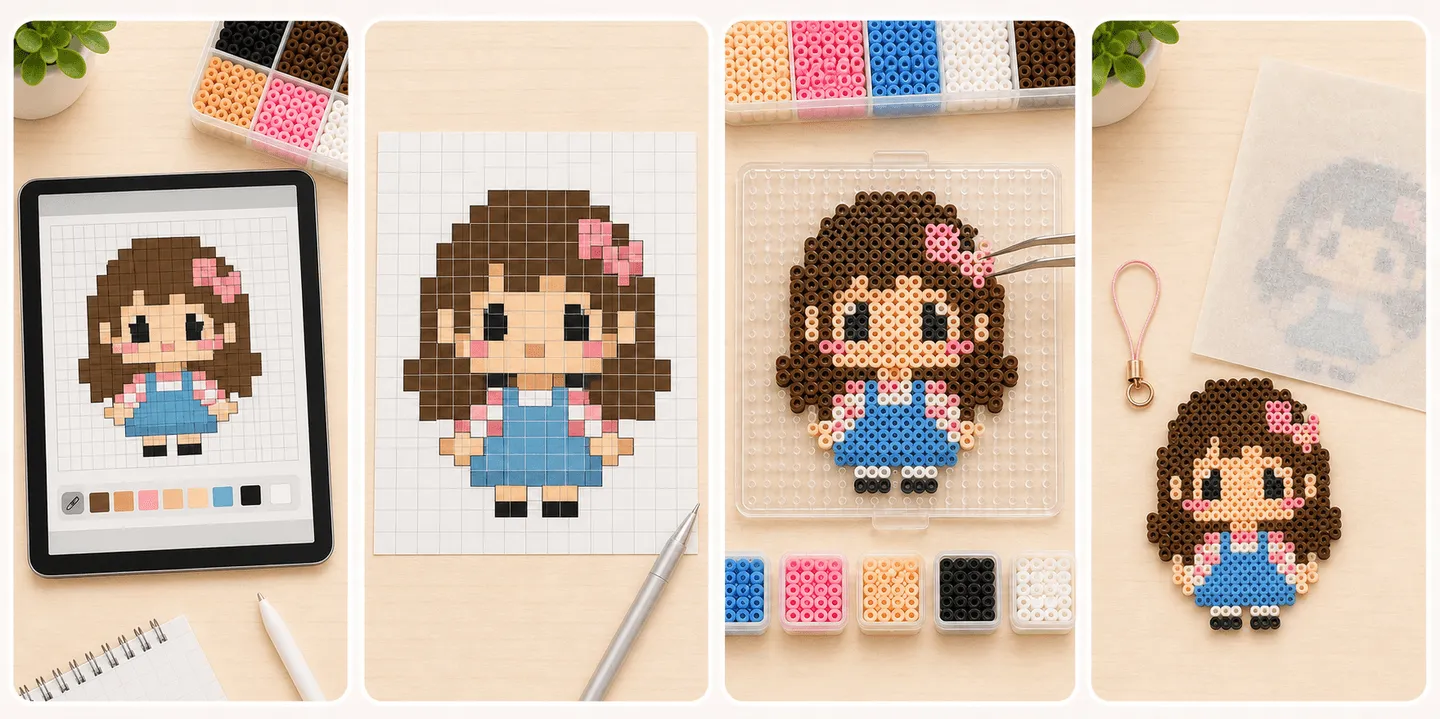
Before you place a single bead, do not rush straight to export. Dress the character first, set the pose you actually want, then use the export blueprint preview to check size, color pressure, and weak joins. Only after that should you move into real placement and ironing.
- Dress the character first, pose it second, and export the blueprint last.
- A character that looks good in the editor still has to survive the export preview size and join check before it is ready for real beads.
- A first real piece should favor solid outlines, moderate size, and fewer broken edges.
- If the design only works because of tiny highlights, thin pose lines, and broken edges, the physical version is much more likely to blur or crack.
- Exporting the pattern is only part of the job. The more important step is stabilizing the outfit, pose, and structure before export.
Dress the character first and decide whether this version deserves a real build
Do not export immediately. First settle the clothing, hair, colors, and overall silhouette, then decide what the piece is meant to become. A charm, coaster, display badge, and flat art piece all put different pressure on size, edge strength, and ironing tolerance.
If the face, hair, skirt edge, or outer shape collapses as soon as you shrink the fully dressed version to the intended size, the design is not ready yet. Go back and reduce detail, reduce colors, or reinforce connections first.
- Lock the clothing, hair, and core palette before you judge size.
- Choose the use first, then the size.
- If it still reads clearly when reduced, it is much safer to build.
- For early projects, prefer patterns with a complete outer silhouette and stable center mass.
After the pose is set, find the places most likely to fail
The biggest problems are often local rather than global, and pose can make them worse: raised arms, stretched legs, weapon tips, ears, tails, one-pixel highlights, thin necks, and other narrow links. On screen they read as cute detail. In the real piece they often become the first parts to break or blur.
Once the pose is fixed, ask whether the design would survive being moved or flipped. If only a few narrow connection points are holding key sections together, the whole piece becomes fragile during the physical workflow.
- The more open or extended the pose is, the more handling risk thin protrusions usually create.
- Critical one-bead-wide joins often need reinforcement or reshaping.
- If the edge is too noisy, cut tiny corner detail before cutting major silhouette lines.
- Too many small color patches increase placement mistakes.
Export the blueprint last, not before the character is settled
Once the outfit and pose are truly settled, the export blueprint preview becomes useful. At that point, do not use it only as a download step. Use it to inspect final size, fragile zones, and how much board pressure the piece will create. Outline preview helps you read whether the silhouette is still clean. Ruler view helps you judge whether the finished size is still realistic for a first physical build.
After the export preview passes that check, then move to the pegboard. The safest rhythm is still to place large stable regions first and return for edges and tiny details later. That makes it easier to catch shape errors early and reduces the odds of a huge late-stage correction.
- In export preview, check total size first, then inspect local weak spots.
- Outline preview is useful for reading whether the silhouette stayed clean.
- Ruler view is useful for judging finished size and board pressure.
- Once the preview is stable, place major body and color blocks before the tiny highlights.
Adjust the ironing strategy to the pattern, not just to preference
A screen pattern will not tell you where heat becomes dangerous, but the real piece will. Designs with fragile edges, narrow links, and dense small details usually respond better to a conservative ironing strategy than to aggressive flattening on the first attempt.
If the pattern depends on small details for readability, chasing a perfectly flat finish can erase the design at the same time. The first goal should be structural success, not the most extreme finish.
- Fragile structures usually call for a more conservative first melt.
- Edges and thin connectors need more care than broad center areas.
- Keeping more outline definition is often safer than forcing a very flat finish.
- If you plan to flip the work, make sure the design is not built on weak links first.
FAQ
Why should I simplify an editor pattern if it already looks good?
Because the screen hides fragile joins, near-matching colors, and noisy edges much better than real beads do. Simplifying is often what makes the first physical version succeed.
What kind of character is best for a first editor-to-real project?
Choose a smaller design with a clear outline, limited colors, and few thin protruding parts. Those patterns are easier to place, move, flip, and iron successfully.
Should I place beads by copying the screen one square at a time?
Not necessarily. Beginners usually do better by placing the main silhouette and larger color blocks first, then returning for the most detailed areas.
When is an editor pattern a bad choice for a first real build?
It is usually a poor first choice when it depends on lots of single-pixel details, narrow joins, complex gradients, or too many near-identical colors to stay readable.