짧은 답
실물로 만들기 전에는 먼저 옷, 포즈, 크기를 확정하고, 내보내기 미리보기로 약한 지점과 빽빽한 부분을 확인하세요. 문제가 없을 때 실제 배치로 넘어가는 편이 훨씬 안전합니다.
- 먼저 옷과 윤곽, 다음은 포즈, 마지막이 내보내기다.
- 화면에서 좋아 보여도 실물에서 안정적인지는 따로 확인해야 한다.
- 첫 실물 작품은 윤곽이 단단하고 가장자리가 너무 부서지지 않은 그림이 좋다.
- 얇은 선이나 작은 하이라이트에만 기대는 도안은 실물에서 무너지기 쉽다.
먼저 모양을 확정하고, 정말 만들 가치가 있는지 본다
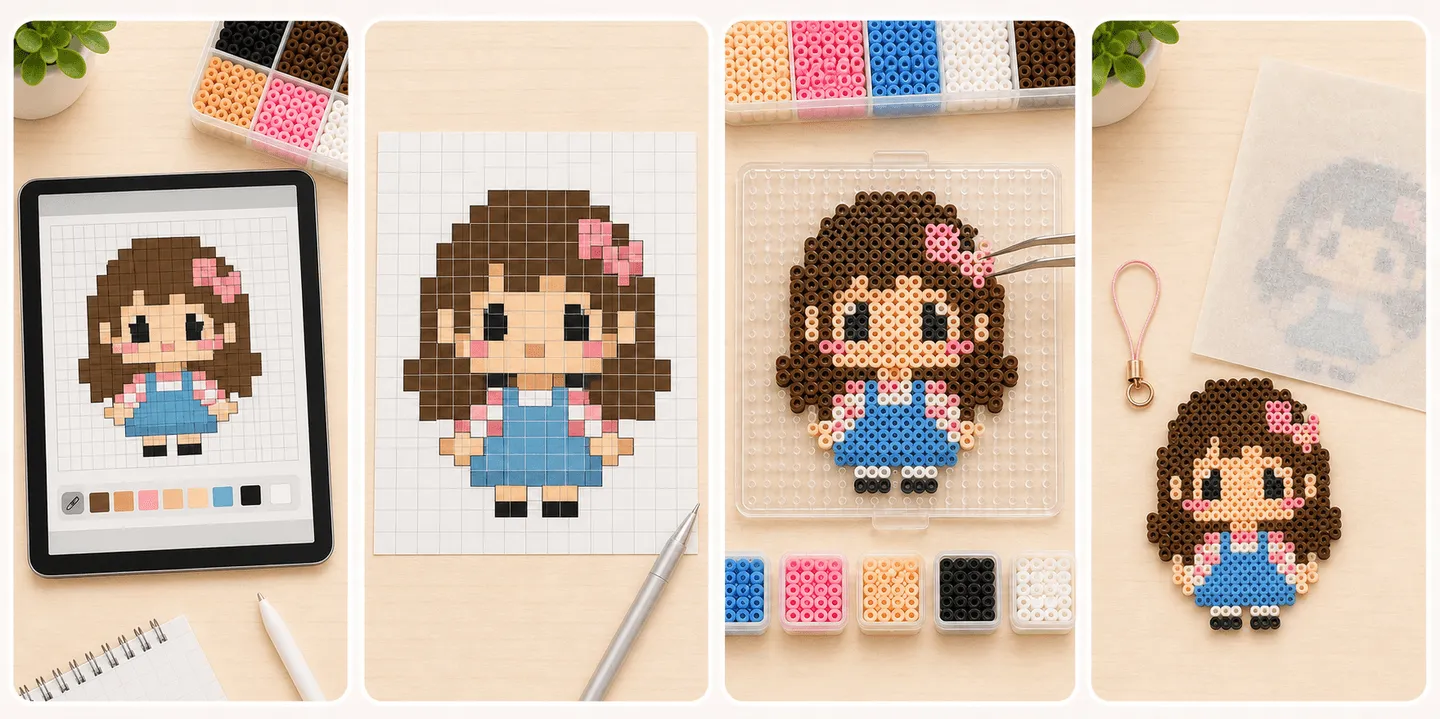
Do not export immediately. First settle the clothing, hair, colors, and overall silhouette, then decide what the piece is meant to become. A charm, coaster, display badge, and flat art piece all put different pressure on size, edge strength, and ironing tolerance.
If the face, hair, skirt edge, or outer shape collapses as soon as you shrink the fully dressed version to the intended size, the design is not ready yet. Go back and reduce detail, reduce colors, or reinforce connections first.
- Lock the clothing, hair, and core palette before you judge size.
- Choose the use first, then the size.
- If it still reads clearly when reduced, it is much safer to build.
- For early projects, prefer patterns with a complete outer silhouette and stable center mass.
포즈를 정했다면 가장 위험한 부분을 찾는다
The biggest problems are often local rather than global, and pose can make them worse: raised arms, stretched legs, weapon tips, ears, tails, one-pixel highlights, thin necks, and other narrow links. On screen they read as cute detail. In the real piece they often become the first parts to break or blur.
Once the pose is fixed, ask whether the design would survive being moved or flipped. If only a few narrow connection points are holding key sections together, the whole piece becomes fragile during the physical workflow.
- The more open or extended the pose is, the more handling risk thin protrusions usually create.
- Critical one-bead-wide joins often need reinforcement or reshaping.
- If the edge is too noisy, cut tiny corner detail before cutting major silhouette lines.
- Too many small color patches increase placement mistakes.
도안 내보내기는 마지막, 캐릭터가 정리된 뒤에
Once the outfit and pose are truly settled, the export blueprint preview becomes useful. At that point, do not use it only as a download step. Use it to inspect final size, fragile zones, and how much board pressure the piece will create. Outline preview helps you read whether the silhouette is still clean. Ruler view helps you judge whether the finished size is still realistic for a first physical build.
After the export preview passes that check, then move to the pegboard. The safest rhythm is still to place large stable regions first and return for edges and tiny details later. That makes it easier to catch shape errors early and reduces the odds of a huge late-stage correction.
- In export preview, check total size first, then inspect local weak spots.
- Outline preview is useful for reading whether the silhouette stayed clean.
- Ruler view is useful for judging finished size and board pressure.
- Once the preview is stable, place major body and color blocks before the tiny highlights.
실물로 만들 때는 도안에 맞춰 다림질 방식도 조정한다
A screen pattern will not tell you where heat becomes dangerous, but the real piece will. Designs with fragile edges, narrow links, and dense small details usually respond better to a conservative ironing strategy than to aggressive flattening on the first attempt.
If the pattern depends on small details for readability, chasing a perfectly flat finish can erase the design at the same time. The first goal should be structural success, not the most extreme finish.
- Fragile structures usually call for a more conservative first melt.
- Edges and thin connectors need more care than broad center areas.
- Keeping more outline definition is often safer than forcing a very flat finish.
- If you plan to flip the work, make sure the design is not built on weak links first.