Short answer
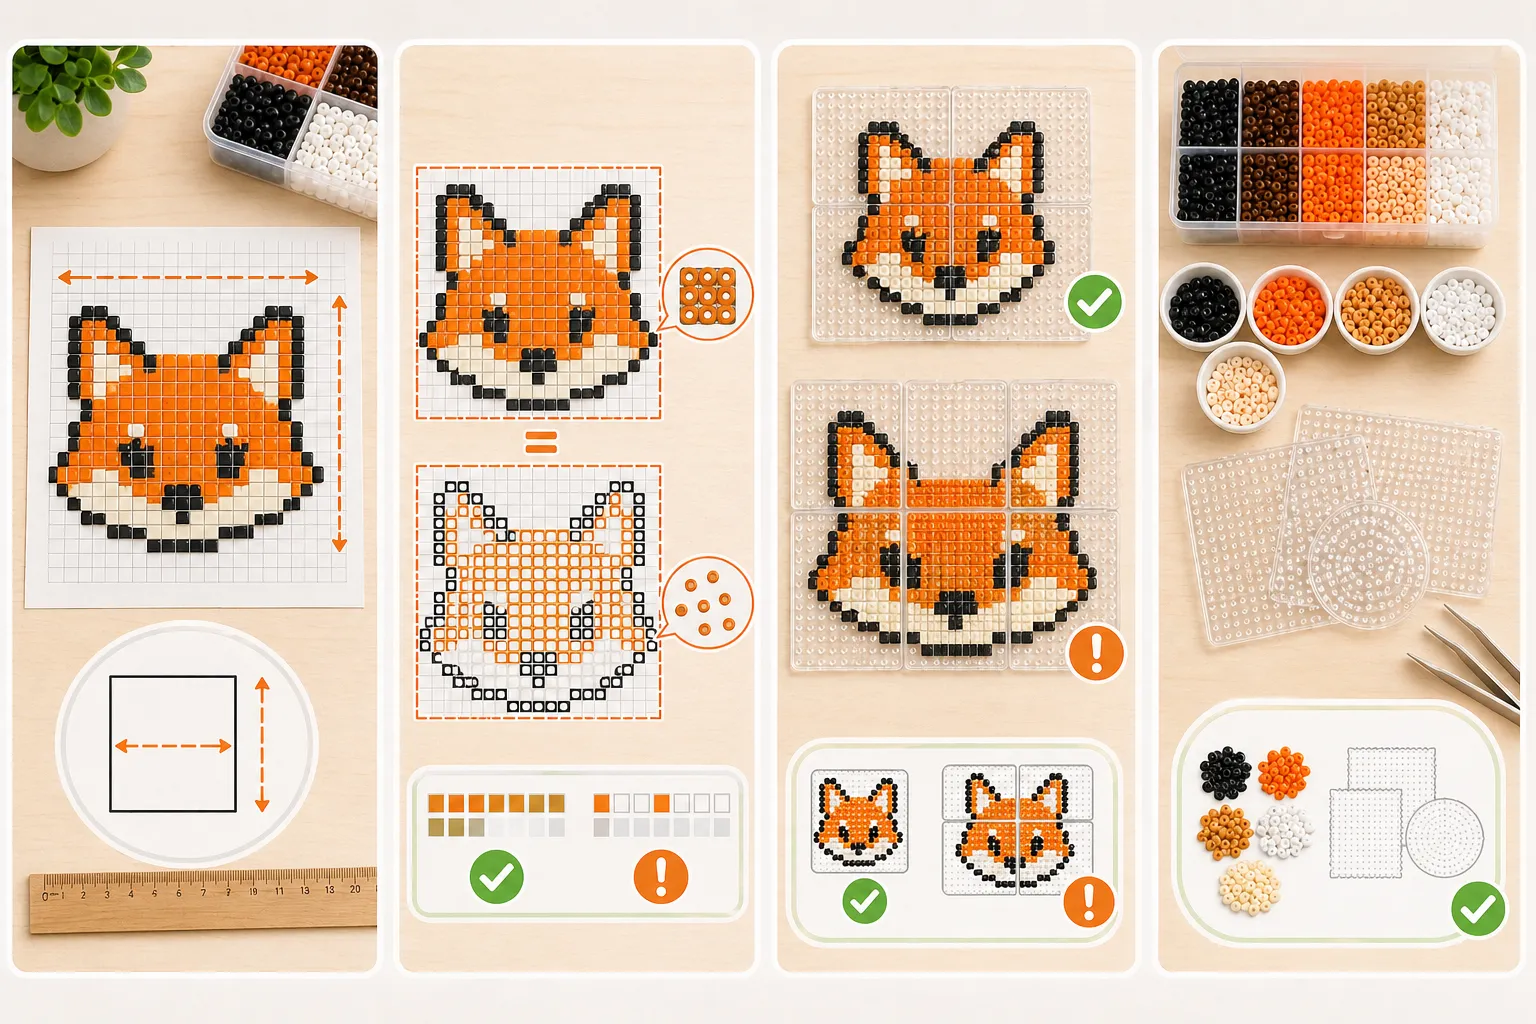
Read the pattern width, height, and filled footprint first, then compare that against the usable placement area of your boards. Estimate beads from the actual filled cells rather than the outer box alone, and give your main colors and high-risk areas some extra margin.
- Start from the real pattern dimensions, not from a visual guess.
- Bead count depends on fill density as much as on outer size.
- Board planning is about usable placement area, not just board count.
- A practical margin helps more than pretending you will hit the exact number perfectly.
Read the pattern size and filled footprint first
The first step is knowing how wide and tall the pattern actually is and how much of that space is truly occupied. Some designs look compact at a glance but spread in awkward ways once you account for protrusions and empty space.
If you are using an editor or export preview, inspect both the dimensions and how the main mass is distributed before you start estimating materials.
Estimate bead count from real fill, not only from the bounding box
A better bead estimate starts from the cells that are actually filled rather than from the outer rectangle alone. A large design with a lot of open background can need far fewer beads than its overall width and height suggest.
If you cannot yet count every color precisely, at least split the estimate into total filled beads and extra margin for the major colors or areas that are more likely to need correction.
- Estimate total fill first, then refine the important colors.
- Main body colors and outline colors usually deserve more margin.
- Fragmented patterns tend to consume more correction time and materials.
Why board count is easy to underestimate
Board planning goes wrong when people judge only by overall area. What matters is the usable placement area of the boards you actually own, plus whether the pattern has ears, weapons, diagonal extensions, or other projections that force awkward spanning.
Two designs can have a similar total footprint while needing very different board setups because one is compact and the other is spread out.
- Compare the design against the real usable area of your boards.
- Compact rectangular designs are often more board-efficient.
- Once the project becomes multi-board, alignment and flipping also get harder.
Estimate time and risk along with materials
Some projects are affordable in beads but expensive in time, attention, and failure risk. For beginners, multi-board builds, many colors, and fragmented edges often cost more energy than the raw bead count suggests.
That is why the best estimate also asks whether the project is simply too large for where you are now.
Common mistakes
- Looking only at width and height without checking how empty or fragmented the design is.
- Ignoring the real usable area of your specific boards.
- Buying exactly the theoretical amount with no buffer.
- Estimating materials without estimating multi-board handling risk.
FAQ
Do I need an exact color-by-color bead count?
For final purchasing, color counts are helpful. But for early decision-making, total fill plus a margin for key colors is often enough to judge the project size realistically.
How do I avoid underestimating board count?
Look at more than area. Check the real usable board size and whether the design has wide projections or a spread-out shape that forces extra spanning.
How much extra bead margin should I keep?
There is no single universal number, but your main colors, outline colors, and areas likely to need correction usually deserve more buffer than the exact theoretical minimum.
When is a design already too large for me right now?
If it asks for many colors, multiple boards, complex flipping, and a scale you have never handled before, it is probably beyond the safest beginner range even if the design itself is attractive.