Short answer
When a design enters clear multi-board territory, treat it like a different class of project. Check whether the footprint, board seams, flipping route, tape-method need, and flattening risk are still manageable for your current level before you commit to the full build.
- Large-project difficulty is driven by boards, flipping, and structure, not only by width and height.
- Once a project becomes truly multi-board, tape method often shifts from optional technique to risk-control tool.
- For a first big build, shrinking the scope is often smarter than forcing a dramatic full-size attempt.
- The usual failure points are seam alignment, flipping instability, uneven heat, and flattening order.
First decide whether the design is already a large-project build
For beginners, a large project is not defined by size alone. It is defined by when the build starts demanding multiple boards, cross-board alignment, a flipping plan, and a wider heat-control window all at once.
Some patterns are not especially huge on paper but still behave like advanced projects because the silhouette is spread out, the edges protrude awkwardly, or the seams would cut through delicate structural points. The real question is not “Is it big?” but “Does it force a big-project workflow?”
- Check whether the design is entering multi-board territory.
- Check whether the silhouette is compact or scattered.
- Check whether there are many thin connectors, spikes, or fragile edge details.
Why board planning gets underestimated so often
People often ask how many boards a project needs, but the better question is how those boards need to be arranged safely. A compact rectangular build and a wide character silhouette can use a similar total area while creating very different seam and flipping risk.
Board count alone is not enough. You also need to know where the seams land, whether they cut through weak bridges, and which parts of the shape will become unstable when the project is handled as one large piece.
- Usable layout matters more than raw board count.
- Compact shapes are usually safer than spread-out silhouettes.
- If seams land on thin bridges or projections, the project gets riskier fast.
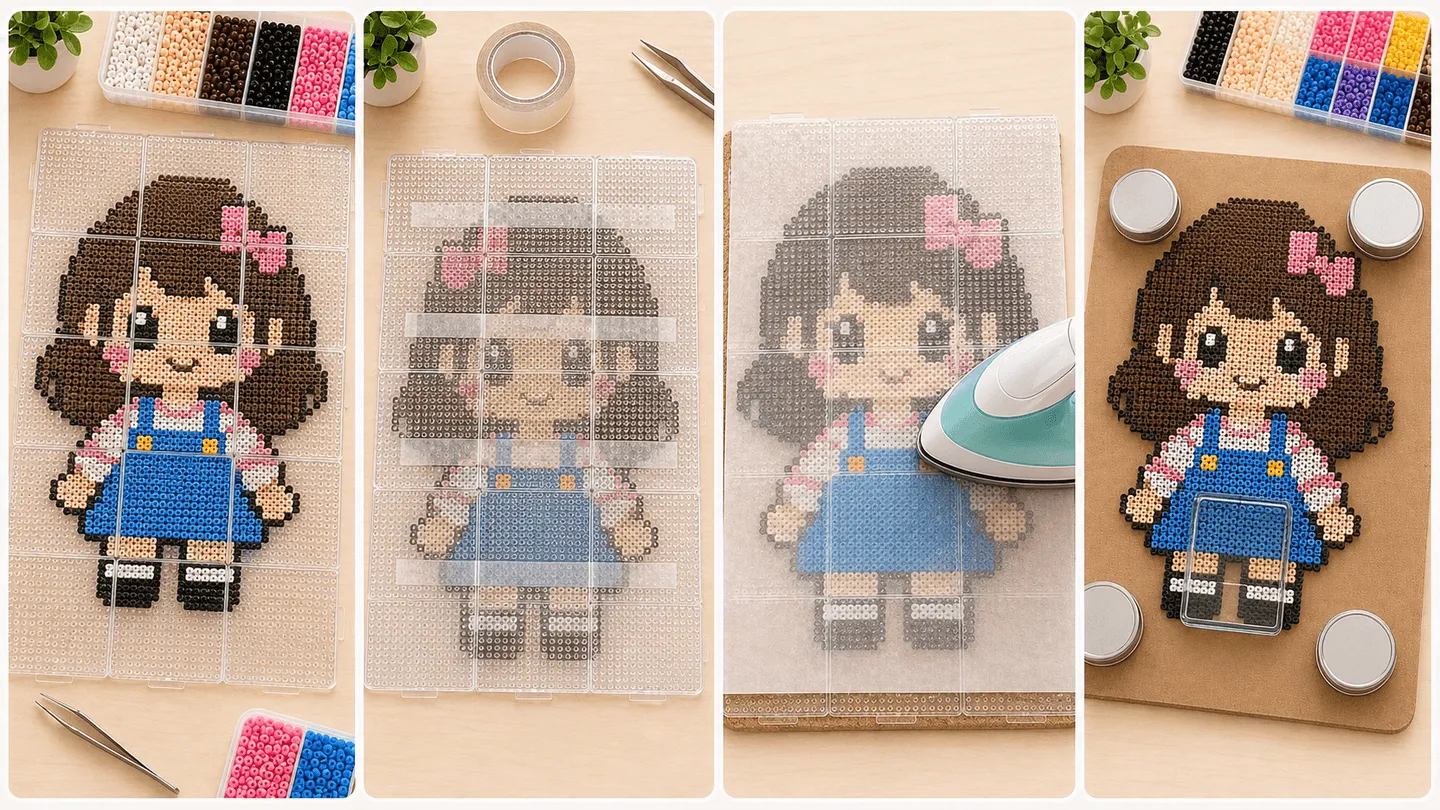
When tape method stops being optional
Once a project is clearly spanning boards or already feels unsafe to lift as a whole, tape method usually becomes worth using. It is not just a “pro technique”. It is often the process that makes a large build realistically manageable.
Many people still approach a first big build as if it were only a larger version of a small piece. That is exactly where flipping becomes dangerous. Tape method matters because it turns the riskiest handling step into a more controlled workflow.
- Use tape method early if the build clearly spans boards.
- Wide silhouettes, delicate bridges, and long edge runs all push the project toward tape method.
- If you already do not trust the lift, that is usually the sign to change process.
The most common ways large projects fail
Large projects usually do not fail because of bead shortage. They fail because a mistake in one step becomes expensive to recover from. Common breakdowns include seam misalignment, shifting during flipping, uneven heat across the piece, bowing during flattening, and fatigue during a long build session.
That is why a serious large-project plan includes failure anticipation. The earlier you can identify the weak steps, the easier it is to resize, simplify, or postpone the design before you sink time into it.
- A small seam error can distort the whole build later.
- The weakest thin bridges are often the first parts to suffer during flipping.
- Uneven heating scales up into flattening problems on larger pieces.
- Fatigue is itself a major risk factor in long builds.
A safer first-large-project workflow
A safer sequence is usually: confirm the pattern footprint, confirm board layout, decide whether tape method is needed, plan the flipping route, and only then commit to full placement. Many failures come from starting too early and solving the dangerous parts too late.
If the pattern is already near your current ceiling, the better strategy is usually more conservative, not more heroic. Shrink it, simplify it, or test a smaller project with the same kind of workflow first.
- Lock the size and process before full placement begins.
- Think through the flip before you think through the finish.
- If the project is near your current limit, reduce difficulty first.
When you should scale the project down instead of forcing it
If the same design stacks multiple boards, many colors, fragile bridges, protruding shapes, and a workflow you have never handled before, it is probably beyond the safest first-large-project range. The smart move is often to reduce the scale, clean the shape, or choose a more compact subject first.
A successful first large project is not the one that looks most dramatic on screen. It is the one that teaches you how to handle the next step up without collapsing halfway through.
FAQ
What should I check first on a large fuse bead project?
Check whether the design is already multi-board and whether the seams would land on fragile structural points. For beginners, workflow risk matters more than raw dimensions alone.
How big is “large” for a fuse bead build?
There is no single universal size. A project becomes large when it demands multiple boards, alignment control, a flipping plan, and more careful flattening than your smaller builds do.
Do all large projects need tape method?
Not every large build absolutely requires it, but once the project clearly spans boards or feels unsafe to handle as one piece, tape method usually becomes the more stable choice.
What is the most common first-large-project mistake?
The most common mistake is underestimating seam layout and flipping difficulty, then piling too many challenges into the same first large attempt.