Short answer
If your beads are not fusing, do not just add pressure. Check four things first: whether the heat is high enough, whether the contact time is long enough, whether the iron is moving too quickly, and whether the weak area is structurally fragile in the first place. Most “still loose after ironing” failures come from incomplete heat coverage or weak design areas, not from a lack of force.
- Check heat and time before you assume the answer is more pressure.
- Edges, tips, and thin connectors fail more easily than broad center zones.
- Some “ironing problems” are really pattern-structure problems.
- If only one area is loose, targeted repair is usually safer than re-ironing everything.
Identify what kind of weak bond you actually have
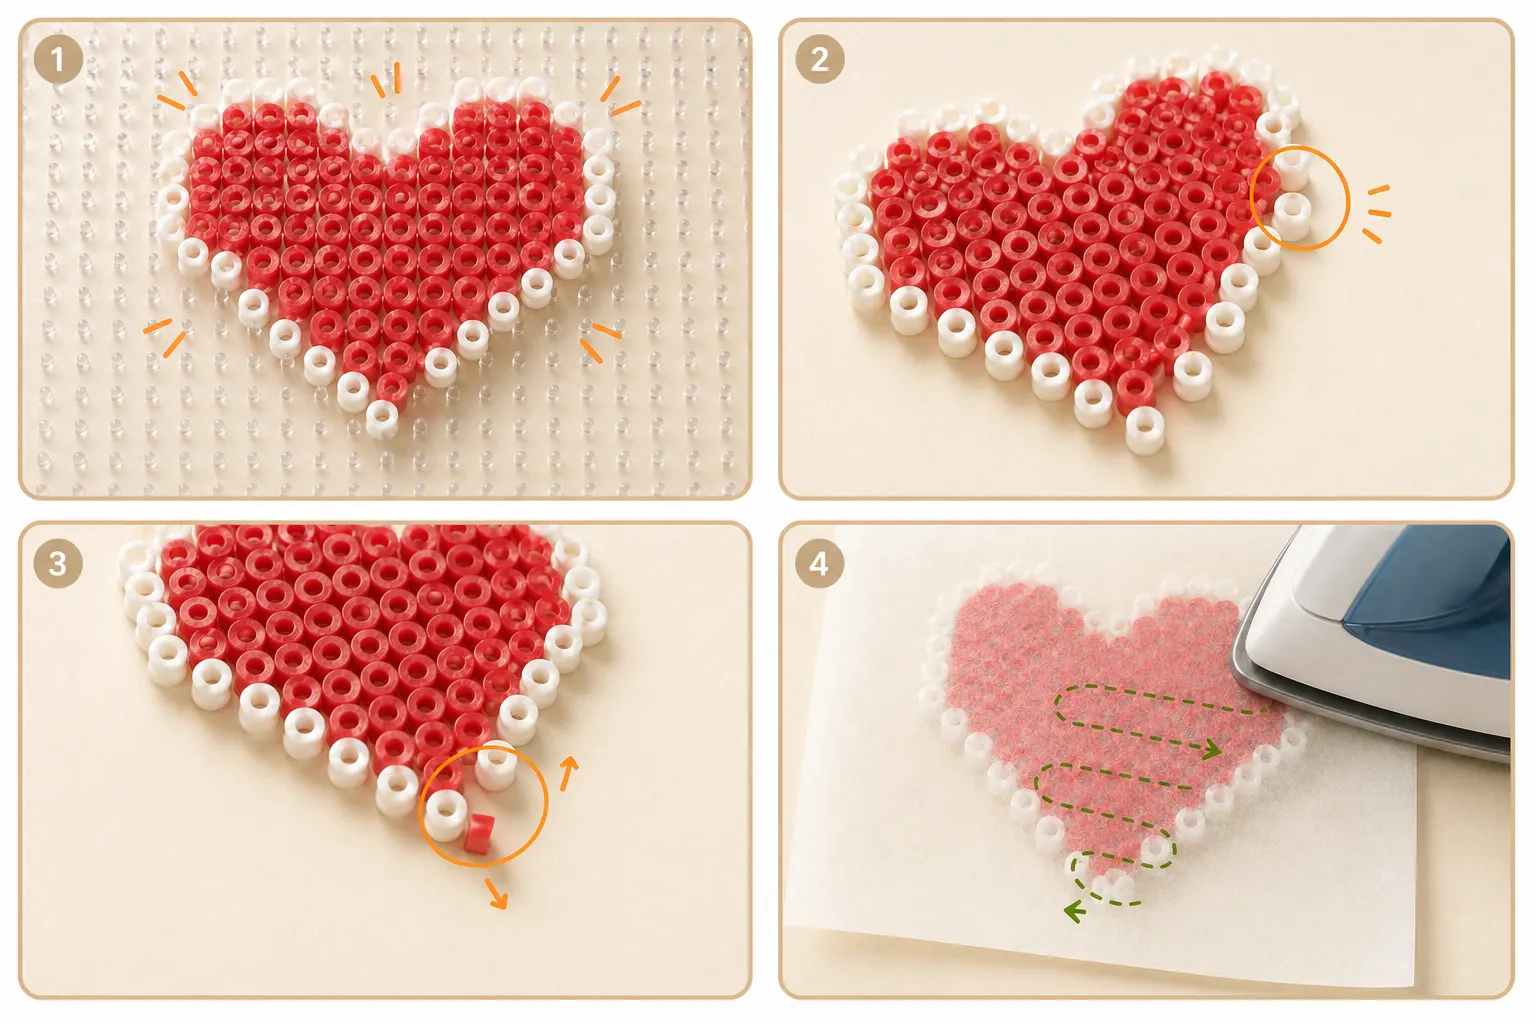
Not every “not fusing” problem is the same. Sometimes the whole piece feels loose. Sometimes only the edges open up. Sometimes thin parts break after a flip. Sometimes the piece seems fine while warm, then small areas split after cooling.
That distinction matters because a loose overall piece usually points to incomplete heat coverage, while a failure isolated to edges, tips, or thin parts often points more strongly to local heat gaps or fragile structure.
- Whole piece loose: check heat, time, and coverage first.
- Only edges loose: check edge coverage and iron path.
- Only thin parts failing: check structural strength first.
- Cracks after cooling: check whether the real bond depth was too shallow.
The four most common causes
The first cause is insufficient temperature. The second is enough temperature in theory, but not enough time to form a real bond. The third is moving too fast, so the heat passes over the area without staying long enough. The fourth is that barrier material, weak edges, or the design structure make the weakness more visible.
Beginners often assume that many passes automatically mean enough ironing, but repeated fast passes can still leave real fusion shallow, especially near the outer edges.
- Temperature too low: beads soften but do not really lock together.
- Time too short: the surface changes before the bond gets deep enough.
- Movement too fast: heat is present but never settles long enough.
- Structure too weak: even a partial bond can split during movement or cooling.
The easiest troubleshooting order
Start by checking where the weakness appears. If the loose sections are mainly on edges, corners, or one-bead-wide joins, the problem is often local rather than global. That means the smartest first fix is usually not a full aggressive re-iron.
If the entire piece feels loose, then move back to overall heat and dwell time. If only one area keeps reopening, a local repair, a better iron path, or even a pattern change is usually more effective than redoing the whole surface the same way again.
- First locate whether the weakness is global or local.
- Global looseness: correct heat coverage first.
- Local looseness: patch locally before redoing everything.
- Repeating failures in the same thin area usually point to structure.
How to repair it without making it worse
If the whole piece is a little loose, the safest repair is usually another even pass with proper barrier material and more intentional coverage, not crushing one spot with force. That lowers the chance of over-melting one zone while the rest still stays under-fused.
If the weakness is only on an edge, corner, or thin part, a local repair is often better. Keep the movement controlled and resist parking the iron too violently in one place. If the join itself is only one bead wide, a heat repair may still have limited success because the structure is the deeper issue.
- Whole piece loose: redo coverage more evenly.
- Only one area loose: try a local repair before a full re-iron.
- Thin repeated failures: consider widening or reshaping the pattern.
- The goal is a stable bond with preserved outline, not the flattest finish possible.
How to stop the problem from coming back
The best prevention is not memorizing a fixed number of seconds. It is learning to watch coverage and structure at the same time: whether edges are getting equal attention, whether the barrier material is letting the bond develop evenly, and whether the thin parts were a bad structural bet from the start.
Project choice matters too. If your earliest builds are full of thin weapons, hair spikes, sharp corners, and one-bead links, the piece will naturally feel less forgiving even when your technique is not terrible.
- Choose more stable beginner projects and patterns first.
- Do not focus only on the center while ignoring edges and tips.
- Many fast passes are not the same as enough real heat coverage.
- When the same area always fails, change the design instead of only blaming the iron.
FAQ
Why are the center beads fused but the edges still come apart?
Edges and tips usually receive less effective heat and lose heat faster. Many pieces are not globally under-ironed; they are just under-covered near the outer structure.
If I ironed it many times and it is still loose, does that mean the temperature is too low?
Not always. The iron may also be moving too fast, or the weak area may rely on a fragile structure that makes the problem look like temperature alone.
Should I re-iron the entire piece if only one area is loose?
Usually not at first. A local repair is often safer, because a full re-iron can overcook the parts that were already bonded correctly.
When does the problem mean the pattern is weak, not the ironing?
If the same thin join, narrow tip, or one-bead-wide connection keeps failing repeatedly, the design structure is usually part of the problem and heat alone may not solve it permanently.