Short answer
The safest way to start 3D fuse beads is not jumping straight into freeform sculpture or a complex character. Start with a small form that has a stable base, repeated sides, clear symmetry, wide joins, and an obvious assembly order. If the project depends on fragile narrow connections or perfect balance from the very beginning, it is probably not beginner-friendly.
- 3D fuse beads are a structure problem before they are a decoration problem.
- Beginner-safe 3D projects usually have a stable base, repeated wall panels, and a predictable build order.
- A lot of pieces that look “badly ironed” are really suffering from weak joints, warped panels, or asymmetry.
- Not every flat pattern deserves to be forced into a 3D build.
Why 3D fuse bead work is not just flat bead work with extra steps
Flat fuse bead projects mostly ask whether one finished face looks right and survives ironing. A 3D project asks something harder: can several faces cooperate, carry each other, and stay aligned once they are assembled into one object?
That is why some small 3D projects are harder than medium flat ones. The challenge is not only the pattern image. It is also angle control, join behavior, cooling distortion, and assembly tolerance. If even one panel drifts, the whole object can start leaning or fighting itself.
- Flat projects succeed panel by panel; 3D projects also need panel-to-panel stability.
- In 3D work, joins and load paths matter as much as the front design.
- The lower the assembly tolerance, the less beginner-friendly the build becomes.
Which 3D shapes are actually safer for beginners
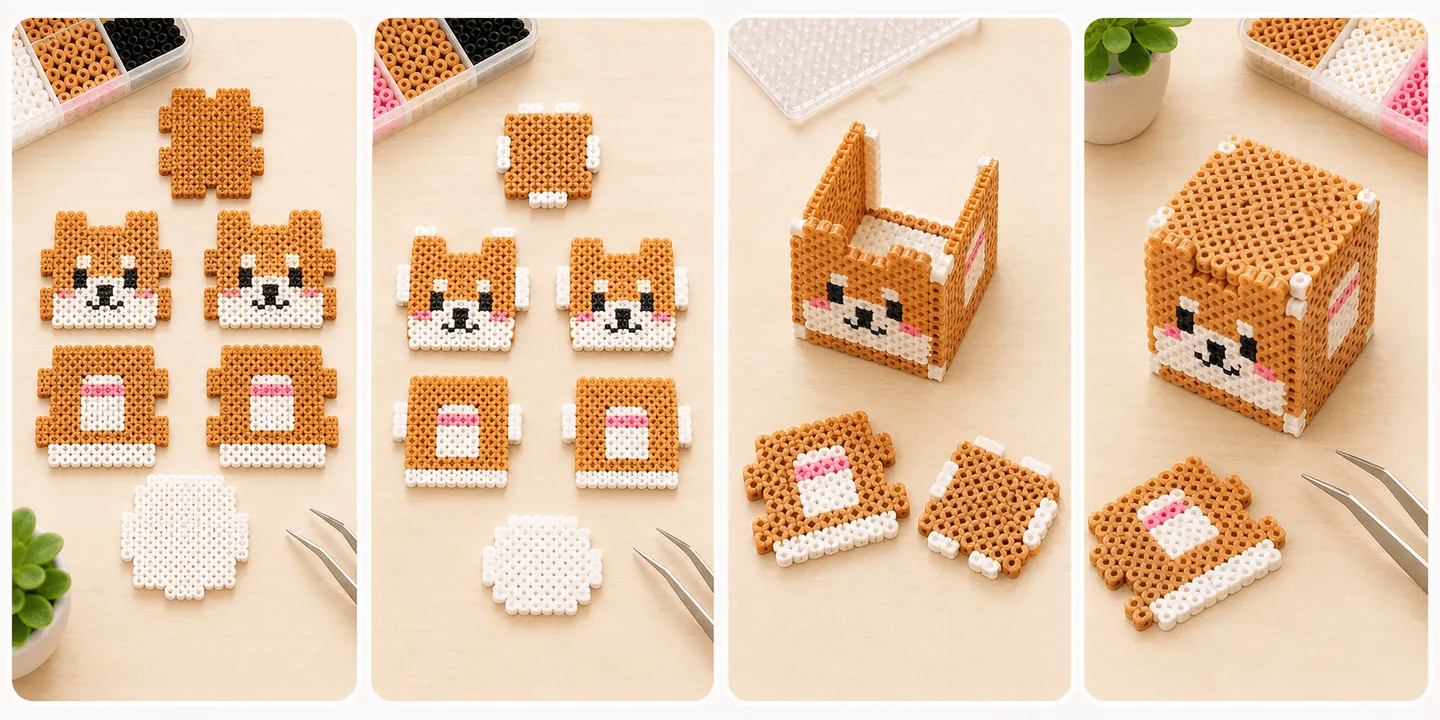
For a first 3D build, the safest projects are usually not the most impressive-looking ones. They are the most regular ones. Small boxes, tiny houses, simple cube-like characters, and other forms with a flat base, repeated side panels, and visible symmetry are usually much easier than curved animals, thin-legged figures, or projects with lots of overhanging detail.
This is not only because they are simpler. It is because their logic is easier to judge before you begin. You can usually tell what is the base, what is the wall, what locks the shape, and what has to be assembled first. Clear structure gives you clearer decision points.
- Prefer shapes with a stable base and obvious left-right balance.
- Repeated panels make sizing and ironing consistency easier.
- Delay freeform curves, thin limbs, and heavy decorative protrusions until later.
Join design decides whether the project really builds or only looks buildable
A lot of 3D fuse bead failures are not caused by poor melting. They are caused by fragile connection logic. If two panels depend on extremely short tabs, very narrow slots, or tiny contact zones, the piece may assemble once but still feel unstable, twisted, or ready to crack when lifted.
For beginners, it is usually smarter to make joins wider and more conservative instead of chasing invisible seams immediately. Fuse beads are not paper. The material has thickness, heat distortion, and small cooling tolerances. Good join design leaves room for those real-world imperfections.
- Avoid one-bead-wide critical load points when possible.
- Short tabs and narrow slots usually reduce assembly tolerance.
- If the shape only works when every fragile join behaves perfectly, it is not a forgiving first project.
Why not every flat pattern should be pushed into a 3D version
Many flat patterns look charming from the front but have no real side logic, no believable base, awkward join locations, or unstable balance once you try to turn them into an object. A silhouette that works in 2D does not automatically become a good volume in 3D.
If most of the appeal comes from front-facing detail rather than clear form blocks, the design is often better kept as a flat hanger, standee, or bead picture. A useful test is whether you can split it into front, back, sides, top, and bottom panels that each have a clear structural job.
- Ask whether the design can be split into panels with clear roles.
- If the side and base logic have to be improvised at the last minute, the 3D route is probably weak.
- A good 2D image does not automatically imply a good 3D build.
Assembly order and ironing consistency matter more than most beginners expect
In a 3D project, assembly order is not a last-minute detail. It should be decided before you start ironing. Whether the base goes first, whether the walls need a dry fit, whether the roof closes the structure at the end, and which parts need to stay especially flat all influence how each panel should be finished.
If one panel is very loose, another is heavily flattened, and a third has a slight bow, their final dimensions and stiffness will not match. Even a correct blueprint can become frustrating to assemble. In 3D fuse bead work, consistency across the set often matters more than making one panel look individually perfect.
- Decide the build order before deciding the final melt style of each panel.
- Panels inside one structure should stay close in size, stiffness, and flatness.
- Dry fitting and labeling parts usually save more time than assembling by guesswork.
Most 3D fuse bead failures are structural long before they are artistic
The most common failures are usually a rocking base, uneven left and right panels, joins that are too narrow, one panel that warped just enough to throw everything off, or a center of gravity that was never stable. They can look like many separate problems, but they are all versions of structure and tolerance management.
That is why troubleshooting 3D builds should not start only with “did I iron enough?” A better order is usually: check whether the base is stable, check whether mirrored parts actually match, check whether the joins are wide enough, and only then ask whether the ironing changed the size too much.
- An unstable base amplifies every later alignment problem.
- Small left-right differences become very visible after assembly.
- If the same seam keeps failing, suspect join width before blaming technique alone.
FAQ
What should a beginner avoid most in a first 3D fuse bead project?
Usually avoid freeform curves, thin legs or necks, heavy overhangs, and shapes that must stand by extremely narrow seams. Those projects combine structure, ironing, and assembly difficulty all at once.
Do all 3D bead projects need slots or tabs?
Not necessarily, but they do need a clear joining logic. That can be slots, tabs, overlaps, wrapped edges, or another repeatable method. The important part is that the connection is wide enough and the build order makes sense.
Why do my panels look fine alone but assemble badly together?
A common cause is inconsistent ironing, which changes panel size, stiffness, and warp level. Another cause is a panel split or join design that was too precision-dependent from the start.
When is a flat pattern not worth forcing into 3D?
Usually when it has no clear side, base, and join logic, or when nearly all of its appeal depends on front-only detail. In those cases it is often stronger as a flat piece.